
Earlier this week I promised a tutorial showing how I changed the color of my son's shirt in a photo to match the rest of the page. Here is the photo with the orange shirt (and a frame) that I will be using on my page.

I need the shirt to be a shade of red to match the digital kit that I want to use to tell my story of this photo, looking back 7 years later. The color is not as important to me as the meaning. This is something you will have to decide for yourself, if you wish to alter your photos in such a way. (This is the way I first learned to do this, please know there are many, many ways to achieve this simple task. If you have a better way or another way ... please feel free to share in the comments.)
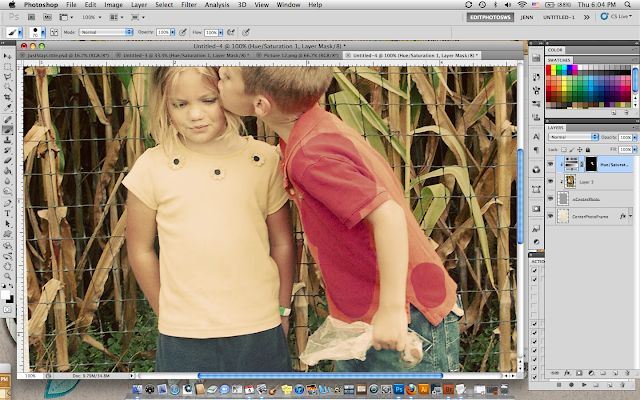
We'll start by creating a Hue Saturation Adjustment Layer. You can go to Layer, Adjustment Layer, and then pushing OK. Or you can go down to the circle that is half white/half black at the bottom of your Layers Palette, as shown below.

Once your Hue Saturation Adjustment Layer is there, you need to clip it into the photo, so that the color changes are only applied to the photo layer (not the frame, or any papers or elements underneath it that end up on your page.) You do this by hovering your cursor over the line between the photo layer and the Hue Saturation Adjustment Layer, and then clicking Opt on a Mac, Alt on a PC.

Your layers palette should look similar to this. With the little angled arrow showing the Adjustment Layer "clipped" into the photo. In my example, I also have the photo clipped into the frame's mask and the frame itself below that. If you are just working on your photo directly, your photo will not have the angled arrow showing that your photo is clipped to anything.
Now lets look at the Sliders within the Hue Adjustment Layer. Here's where you play around with the sliders to achieve the look you are after. You can click where it says Master, and you will see channels for Red, Green,Blue, Cyan, Magenta and Yellow and you can tweak the sliders for the colors individually. For this orange shirt, I opted to leave the setting on Master.

Start with the Hue and only focus on the changes being made to the shirt because all the colors will start to change. We'll fix that later. Slide the Hue slider until it starts to get into the color you are looking for. Once I got to a red that I sort of liked (-25), I moved down to the Saturation slider. I needed to increase the saturation of my red so I moved my slider to the right (+13). Last, I needed to tweak the lightness and make that red a touch darker (-14). Be careful when playing with your lightness & saturation sliders that you don't over tweak it to the point that you lose all the details and shadows.
Now we need to create a mask so we can block the color change everywhere except the shirt. We do not want that reddish hue on the skin, the grass, the corn, etc. While still on the Hue Saturation Adjustment Layer click the mask button at the bottom of your layers palette. It's the one that looks like a grey square with a white circle inside, right next to the Hue Sat button. Press "D" (for default) to make sure your foreground/background colors are white and black. Then press CTRL and "I" to fill the mask with black. (This inverts the entire mask, from white to black.)

In the example above you can see the Hue Saturation Adjustment Layer with the newly created mask filled with black. The photo looks just like it did before we started playing with our sliders. But don't fret. With masks anything painted black is hidden ... black conceals. And conversely, anything that gets painted with white is shown ... white reveals. So right now our entire hue saturation edits that we made (the red tones) are hidden by the mask because it is completely painted over in black. We are going to use our Brush Tool to paint (with white) over the orange shirt to reveal the red. To make sure we are in fact painting on the mask click the black mask. You'll see little black lines surrounding it to indicate it is "selected".
Press "B" for the brush tool and select a small hard edge brush. Use your "[" key to quickly decrease the size of the brush, and the "]" key to increase the size of the brush. We pressed "D" earlier to ensure our colors are set to default. Our foreground should be white. Zoom in on the shirt (or whatever area it is within your photo that you wish to reveal the Hue Saturation Adjustment Layer) and just start to paint.


I need the shirt to be a shade of red to match the digital kit that I want to use to tell my story of this photo, looking back 7 years later. The color is not as important to me as the meaning. This is something you will have to decide for yourself, if you wish to alter your photos in such a way. (This is the way I first learned to do this, please know there are many, many ways to achieve this simple task. If you have a better way or another way ... please feel free to share in the comments.)
We'll start by creating a Hue Saturation Adjustment Layer. You can go to Layer, Adjustment Layer, and then pushing OK. Or you can go down to the circle that is half white/half black at the bottom of your Layers Palette, as shown below.
Once your Hue Saturation Adjustment Layer is there, you need to clip it into the photo, so that the color changes are only applied to the photo layer (not the frame, or any papers or elements underneath it that end up on your page.) You do this by hovering your cursor over the line between the photo layer and the Hue Saturation Adjustment Layer, and then clicking Opt on a Mac, Alt on a PC.

Your layers palette should look similar to this. With the little angled arrow showing the Adjustment Layer "clipped" into the photo. In my example, I also have the photo clipped into the frame's mask and the frame itself below that. If you are just working on your photo directly, your photo will not have the angled arrow showing that your photo is clipped to anything.
Now lets look at the Sliders within the Hue Adjustment Layer. Here's where you play around with the sliders to achieve the look you are after. You can click where it says Master, and you will see channels for Red, Green,Blue, Cyan, Magenta and Yellow and you can tweak the sliders for the colors individually. For this orange shirt, I opted to leave the setting on Master.

Start with the Hue and only focus on the changes being made to the shirt because all the colors will start to change. We'll fix that later. Slide the Hue slider until it starts to get into the color you are looking for. Once I got to a red that I sort of liked (-25), I moved down to the Saturation slider. I needed to increase the saturation of my red so I moved my slider to the right (+13). Last, I needed to tweak the lightness and make that red a touch darker (-14). Be careful when playing with your lightness & saturation sliders that you don't over tweak it to the point that you lose all the details and shadows.
Now we need to create a mask so we can block the color change everywhere except the shirt. We do not want that reddish hue on the skin, the grass, the corn, etc. While still on the Hue Saturation Adjustment Layer click the mask button at the bottom of your layers palette. It's the one that looks like a grey square with a white circle inside, right next to the Hue Sat button. Press "D" (for default) to make sure your foreground/background colors are white and black. Then press CTRL and "I" to fill the mask with black. (This inverts the entire mask, from white to black.)

In the example above you can see the Hue Saturation Adjustment Layer with the newly created mask filled with black. The photo looks just like it did before we started playing with our sliders. But don't fret. With masks anything painted black is hidden ... black conceals. And conversely, anything that gets painted with white is shown ... white reveals. So right now our entire hue saturation edits that we made (the red tones) are hidden by the mask because it is completely painted over in black. We are going to use our Brush Tool to paint (with white) over the orange shirt to reveal the red. To make sure we are in fact painting on the mask click the black mask. You'll see little black lines surrounding it to indicate it is "selected".
Press "B" for the brush tool and select a small hard edge brush. Use your "[" key to quickly decrease the size of the brush, and the "]" key to increase the size of the brush. We pressed "D" earlier to ensure our colors are set to default. Our foreground should be white. Zoom in on the shirt (or whatever area it is within your photo that you wish to reveal the Hue Saturation Adjustment Layer) and just start to paint.

You can see the red starting to show through the mask. Remember to increase and decrease the size of your brush to get in close and get crisp lines. If you make a mistake, like paint over the arm accidentally, simply press "x" to swap the foreground color back to black to conceal your mistake. Then press "x" again to continue painting in white to reveal the red.

And here is the finished photo with the shirt "painted" red. The skin and corn and grass are all as they should be. You can also see the bits of white (the parts that are "revealed" in the mask up in the layer palette.
Note: There are lots of selection tools in photoshop that will help you achieve these type of selective adjustments as well. For something simple like this shirt, I find it easy to quickly paint it in by hand.
Here is the final scrapbook page. I think the red shirt looks much better, than had I left it orange. What do you think?

I hope you enjoyed this quick photoshop tutorial on how to do a selective color change within your photo.
-xoxo jenn
3 comments:
Sweet blog! So glad to be participating in Flying Lessons with so many remarkable and talented women! ~ Seasons of Grace & Wisdom
Wow Jenn! You totally rocked this tut! Great job and adorable LO!
Nice blog and that photoshop tutorials will be helpful. Thanks for sharing.
Post a Comment