Pages

Monday, October 29, 2012

Memory Keeping Monday

I've got a ton of digital scrapbook layouts to share with you this Monday. This first set of four pages is full of the latest and greatest digi goodies from the very talented designers of jessicasprague.com.

First up is a fun Project Life style layout featuring lots of digi goodies from Samantha Walker.


Next up is a Christmas Cookie layout using Splendid Fiins: Go Big Template and Samantha Walker's recently released Christmas Tradtions - Mega Kit.
Here is a sweet page using lots of Jenni Bowlin goodies.


Time with Grandparents
Jenni Bowlin -
Town Square Collection

Printed Tickets Expressions

Rhinestone Buttons & Bows


Dani Mogstad

Hello Sunshine Complete Kit

Snap Happy Complete Kit

School Daze Complete Kit

Playdate Complete Kit


Linda Roos

Foto Template Pack
 
And lastly, a page about the sometimes stressful side of parenting.  
September has me Going Batty
Samantha Walker:
Digital Cuts Bat Moon Frame

A to Z Flashcard pack

A to Z School Images

Harvest Moon Solid Textured papers


Other: Anna Aspnes

Artplay Palette Scholarly
katie Pertiet: painting tutorial & Watery Photo Masks No1 
 
 
This month, I'm also documenting memories and sharpening my photoshop skills with Jana Morton's class: Blending & Beyond. So fun. Here are some of the layouts I've been working on from that fabulous class.
 Surfing 101

Anna Aspnes
ArtPlay Palette 4 (backgrd paper - recolored)
ArtPlay Palette Sunshine Bouquet
ArtPlay Palette H2O

Katie Pertiet

Artistry de Azul
Painted Edgers No4
Grungy Ledger Grids No3
Edge Overlays No3
Tropical Clusters
Cut Ups Destination 


lil moto man

katie pertiet:
classic coral cardstock
lightly letterbox 3
edge overlays no 3
stacked vintage frames
off road brushes
eat cake - photo corners
tag from chat freebie


 Discovering Sand Crabs

Katie Pertiet
Sacked Solids Neutral
Paper Reveals LT
Ad Inspiration Stamp 6 11 11
Ad Inspiration Word Art 9 11 12
Catalog Inspiration Photo Frame- recolored 9 5 10
Collageable Chat Freebie _crochet heart
Cold Spring Kit - string/bow
Ad Inspiration - Embroidered Accent 4 14 12
 
That's it for this Monday! Have a great week.  
Friday, October 26, 2012

Friday Fotologue

During the summer, I am really good at taking a lot of photos. I think it's because we are outside so much & there is always something going on. When school starts up again, the days become much more routine, structured and burdened with homework and places to be. I definitely use my camera less. I do want to try and change that, even if in just small ways. I loved doing the Summer Friday Foto Frenzy series where I shared the little tidbits of our lives from the previous week; and I'd like to continue with that as perhaps a way of inspiring myself to pick up my camera (or iPhone) more regularly during the colder months of the year. So ... as often as I can (shooting for one or two Fridays per month), I bring you a new series ...

Friday Fotologue: a peek into my world as seen through my lens. Hope you enjoy.

(credits: Pink Paislee: Caught on Camera (tab, photo frames), Splendid Fiins: wishi washi- skies are grey, and Micheline martin: nature lover -camera)

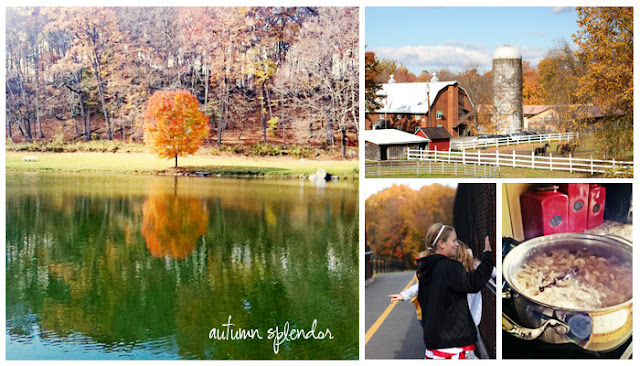
Autumn is here and going fast. Enjoying every bit of it that we possibly can before winter weakens our spirit and has us running for the warmth of indoors.

The little dude is growing out of old activities and seeking new adventures that interest him.


Everyday moments ... little tidbits of our life.


Living for the weekends ... this one in particular was spent on the apple farm.


Hope you are enjoying your season where ever you are in the world.


Sunday, October 14, 2012

What's for Dinner Weekly ... my menu planner


Sunday - Spinach Artichoke Pasta (love anything & everything Ree whips up in the kitchen, but i'm going to omit all the cheeses and breadcrumbs and just cook the core ingredients in some broth with a touch of freshly grated parmesan)
thepioneerwoman.com

Monday - Black Bean Chili with Avacado Salsa
deliaonline.com


Tuesday - Teriyaki Porkloin with Baked Delicta Squash & Veggie Medley (another one of my own recipes - i just marinate the pork loin in soy sauce, Worcestershire sauce, and grated fresh ginger, S&P to taste. the squash is cut in half, scraped of seeds, and baked flesh side down with a bit of water in the pan. needs nothing added, so good!)

Wednesday - Winter Minestrone Soup (this can be made and served in less than an hour... although veggies are more tender if you cook longer.) with Paninis on Ciabatta Bread
theurbanspork.com

Thursday - left over soup, chili and pork (waste not, want not)

Friday - Cranberry Cherry Chicken Wrap with Raw Veggies and Hummus (this is on our super busy, on-the-go night ... think this will do as a meal in the car in between activities) menumusings.blogspot.com

Saturday - Chinese Chicken Salad -
www.lhj.com

Anyone try any of the recipes I posted last time? Curious to know if you liked them?

Wednesday, October 10, 2012

Life Book 2013 ... are you in?


Yesterday I came across some interesting information about an online course. Life Book 2013, is a year long mixed media class created by Tamara Laporte from Willowing Arts. Life Book 2012 is currently running ... and if you go to Tam's website, you can read the testimonials for the current session. I'm told, from someone who is currently in the class, that there over 1000 participants! Imagine, 1000 like-minded friends coming together to paint, learn, share, grow and explore. Ah-mazing! And the line up of artists that are teaching, so incredible! If you are a scrapbooker, you'll probably recognize names like Christy Tomlinson, Dina Wakely and Melody Ross (yeah I know!).


Check out Tam's info page to learn more about how the class is set up, take a peek at the amazing artists that will be sharing their techniques and read some of the feedback. And then let me know if you are in. :)


Thursday, October 4, 2012

Technique Thursday ... Photoshop Tutorial : Recolor Part of Your Photo to Match Your Digital Layout

Earlier this week I promised a tutorial showing how I changed the color of my son's shirt in a photo to match the rest of the page. Here is the photo with the orange shirt (and a frame) that I will be using on my page.


I need the shirt to be a shade of red to match the digital kit that I want to use to tell my story of this photo, looking back 7 years later. The color is not as important to me as the meaning. This is something you will have to decide for yourself, if you wish to alter your photos in such a way. (This is the way I first learned to do this, please know there are many, many ways to achieve this simple task. If you have a better way or another way ... please feel free to share in the comments.)

We'll start by creating a Hue Saturation Adjustment Layer. You can go to Layer, Adjustment Layer, and then pushing OK. Or you can go down to the circle that is half white/half black at the bottom of your Layers Palette, as shown below.


Once your Hue Saturation Adjustment Layer is there, you need to clip it into the photo, so that the color changes are only applied to the photo layer (not the frame, or any papers or elements underneath it that end up on your page.) You do this by hovering your cursor over the line between the photo layer and the Hue Saturation Adjustment Layer, and then clicking Opt on a Mac, Alt on a PC.


Your layers palette should look similar to this. With the little angled arrow showing the Adjustment Layer "clipped" into the photo. In my example, I also have the photo clipped into the frame's mask and the frame itself below that. If you are just working on your photo directly, your photo will not have the angled arrow showing that your photo is clipped to anything.

Now lets look at the Sliders within the Hue Adjustment Layer. Here's where you play around with the sliders to achieve the look you are after. You can click where it says Master, and you will see channels for Red, Green,Blue, Cyan, Magenta and Yellow and you can tweak the sliders for the colors individually. For this orange shirt, I opted to leave the setting on Master.


Start with the Hue and only focus on the changes being made to the shirt because all the colors will start to change. We'll fix that later. Slide the Hue slider until it starts to get into the color you are looking for. Once I got to a red that I sort of liked (-25), I moved down to the Saturation slider. I needed to increase the saturation of my red so I moved my slider to the right (+13). Last, I needed to tweak the lightness and make that red a touch darker (-14). Be careful when playing with your lightness & saturation sliders that you don't over tweak it to the point that you lose all the details and shadows.

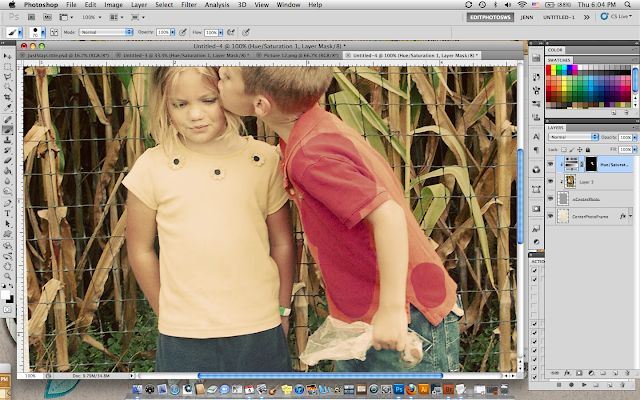
Now we need to create a mask so we can block the color change everywhere except the shirt. We do not want that reddish hue on the skin, the grass, the corn, etc. While still on the Hue Saturation Adjustment Layer click the mask button at the bottom of your layers palette. It's the one that looks like a grey square with a white circle inside, right next to the Hue Sat button.  Press "D" (for default) to make sure your foreground/background colors are white and black. Then press CTRL and "I" to fill the mask with black. (This inverts the entire mask, from white to black.)


In the example above you can see the Hue Saturation Adjustment Layer with the newly created mask filled with black. The photo looks just like it did before we started playing with our sliders. But don't fret. With masks anything painted black is hidden ... black conceals. And conversely, anything that gets painted with white is shown ... white reveals. So right now our entire hue saturation edits that we made (the red tones) are hidden by the mask because it is completely painted over in black. We are going to use our Brush Tool to paint (with white) over the orange shirt to reveal the red. To make sure we are in fact painting on the mask click the black mask. You'll see little black lines surrounding it to indicate it is "selected".

Press "B" for the brush tool and select a small hard edge brush. Use your "[" key to quickly decrease the size of the brush, and the "]" key to increase the size of the brush. We pressed "D" earlier to ensure our colors are set to default. Our foreground should be white. Zoom in on the shirt (or whatever area it is within your photo that you wish to reveal the Hue Saturation Adjustment Layer) and just start to paint.


You can see the red starting to show through the mask. Remember to increase and decrease the size of your brush to get in close and get crisp lines. If you make a mistake, like paint over the arm accidentally, simply press "x" to swap the foreground color back to black to conceal your mistake. Then press "x" again to continue painting in white to reveal the red. 

And here is the finished photo with the shirt "painted" red. The skin and corn and grass are all as they should be. You can also see the bits of white (the parts that are "revealed" in the mask up in the layer palette. 

Note: There are lots of selection tools in photoshop that will help you achieve these type of selective adjustments as well. For something simple like this shirt, I find it easy to quickly paint it in by hand. 

Here is the final scrapbook page. I think the red shirt looks much better, than had I left it orange. What do you think?


I hope you enjoyed this quick photoshop tutorial on how to do a selective color change within your photo. 

-xoxo jenn

Tuesday, October 2, 2012

The little girl gets crafty too ... A creative mom learns a valuable lesson about what it really means to raise "creatively-confident" kids.

I am such a control freak about the way things look. I know this about myself. But it hits you a little longer and a little harder, when your kids confess these things to you as well.

Yesterday I took my daughter out to the mall to pick out party favors for her upcoming sleepover birthday party. And on the drive back home we talked about how we were going to package them. (I love packaging! Don't you?) I told her that this year she could do it all by herself, since she was old enough to handle it. (Last year, I'm sure I whipped up some little design bits in Photoshop and had a decent role in planning what they looked like, even if she was the one who assembled it all.) She smiled from ear to ear upon hearing this ... and then she confided in me that a few years back ... while we were making Valentine's for her classmates (I designed these cute little cards and lollipop covers in Photoshop) that I basically took over her project, because everything had to be "just so". She confessed that she felt a little sad that I didn't trust her to make them look pretty enough.

What?!?! Oh my goodness. Sweet girl ... this isn't about you, or anything you do wrong; unfortunately I'm the one with the issues. Ugh.

Yes, I can totally see myself being like this, I mean I know I am. I guess I just didn't think about how my control issues affected my children. How my need to decorate and design and make things pretty might be hindering their creativity. I always thought that growing up with playdoh, fingerpaints and endless art supplies was the dream I never had. That I was doing everything so right. I mean my kids have wet felted. They have their own supply of canvas, acrylics, oil paints & pastels. Oh no, it's not just markers and crayolas in this household. They have tried embroidery darn it!

But at that moment I felt something of a failure. What she remembered was not all those fun, playful and creative moments. She remembered her school Valentine's and how I made that project all mine. Sigh.

So last night, I gave her the treat bags, her pick of my ribbons, stickers and blank tags (no Photoshop designed artwork that I whipped up) and let her have at it. And she lit up with excitement. She lit up with pride. She lit up ... because dear friends, this project was all hers.

And they are pretty. And they are perfect. And they are made with love.


--xoxo jenn

Monday, October 1, 2012

Memory Keeping Monday

Hello. Today I'm sharing some lovely digital scrapbook layouts using some of the hot, new products from the talented designers over at jessicasprague.com.

Dani's Just Stay Little kit immediately made me seek out a photo of my children taken at a local orchard during Pumpkin Picking Season. This photo is so near and dear to me. It was taken over 7 years ago, when my Two were just wee little things. They weren't afraid to kiss, and hug, and show their love for each other. (Note: If you have wee little ones that do this type of mushy, lovey-dove stuff on a regular basis, cherish this moment in time ... it doesn't last forever; at least not in my house). My Two are in middle school now ... and hugging and kissing just does not happen.


Just Stay Little
Dani Mogstad
Just Stay Little kit

Splendid Fiins
@ the office supplies 1

Sew Crafty - messy stitches vol 1


TIP:  My son was actually wearing an orange shirt on this beautiful fall day. At the time I thought I was so clever putting my children in autumn hues like golden yellow and orange to match the scenery. Fast forward 7 years, and here I am trying to match this photo, not to an autumn layout, but to a layout that is so much more meaningful; remembering yesterday and the way they were at that very moment in time. Sooooooo ....  to help the color scheme of the page come together, I tweaked it to a red tone to coordinate with the digital kit. Come back to the blog later this week and I'll walk you through how I did that quick shirt color change in Photoshop.

Next up is a scrapbook page using photos that were taken on day trip to a small local zoo that rescues animals when the big zoos do not have a use for them anymore. :( We love to come here to help support these animals as they live out the remainder of their lives. They are all beautiful creatures. This layout is a grid layout, but without the typical square or rectangle as the dominant shape. I like to change things up a bit ... and this is what I ended up with.


Lovely Day
Lori Whitlock
Masking Templates Set 3
Fresh Air Collection

Dani Mogstad
Chasing Rainbows Complete Kit
Softly Falling Complete Kit

Liv.e Designs
Bubbling Over Stamps & Brush Set
{Click-The Elements}

Pink Paislee
Caught On Camera Elements

Other: Anna Aspnes
Stitched by Anna 12 x 12 Borders No. 1
And last up is a digital desktop calendar for 2013 made using Lori Whitlock's 2013 Calendar templates. I just expanded the size a bit and added some customizations. I saved my layout as a PSD file in Photoshop and now I can quickly go in and change my photos on the desktop calendar to match my mood, the seasons or a paticular holiday. Easy Peasy. And I feel so ahead of the game!  
2013 Desktop Calendar
Lori Whitlock
2013 Calendar 8x10 Horizontal

Autumn Afternoon Collection

Happy Day Collection

Fall Masking Set


Echo Park-

Everyday Eclectic Full Collection


Pink Paislee-

Spellbound Element Pack


Frame-Jessica Sprague Template A
That's it for today. Happy Monday!

ShareThis

Related Posts Plugin for WordPress, Blogger...